Wednesday, March 31, 2010
Happy Happy Birthday
Hello and Welcome!
How is your day going? Good I hope! It's a special day for our family as my Mom celebrates her 82nd birthday today! No, she won't disown me for telling her age!! She will gladly tell you herself! LOL! We are thankful we made it another year and have no qualms about our age! I made her a special birthday card and you can see it here! She and a dear friend, who has a birthday on the 29th, got to spend the day yesterday being treated to a spa manicure and pedicure and then lunch.
I think my friend, Mary, and I had a better time than they did just watching them be pampered and petted! It was a wonderful day and a great memory maker!
We have lots of Spring birthdays for our family and friends so, I have been kept busy making cards and gift card holders. The card I am sharing today is one of my favs 'cause I love anything to do with birds! I started with a white card stock base and adhered the Spring DP. The bird and cage are cut with my Cricut. I added a pearl dot for the eye and a sheer ribbon at the top. The sentiment is stamped and then punched with a deckle square punch. The border is punched with an EK Success punch.
I plan to share some more of the cards I am making for the birthdays this month, so, please hurry back and let me know you were here! I love getting your feedback and suggestions for the blog, the pics, or the projects! We are halfway thru this week, and I hope you have a wonderful few days until we celebrate the blessed day of Easter!
Blessings to you,
Vicki
Monday, March 29, 2010
Happy Easter!
Hello Friends!
We had a great time Saturday with our church's Senior group, The KeenAgers! It was an afternoon filled with fun, food and fellowship! We always try to have some little goodies as party favors and take home treats. I thought I would share those with you today!
We were fortunate to find chocolate crosses at a nominal price, but to add to the treat, I stamped an Easter card and adhered it to the back of each box. It covered up the nutritional info; but, if you are eating chocolate, does it really matter?!?!? LOL!! We placed one of these at each table setting. We also made up treat bags for everyone. I was able to find these cute bags at the dollar store. I love the colors! In each bag we included various bite size types of candy, a chocolate bunny, a notepad, a pencil, a mini drum ( that you play by rolling in your hands and says "make a joyful noise"), a seed packet and a plastic egg with an Easter penny and poem inside! The Easter penny poem reads:
Here is an Easter penny
All shiny and new
To remind you of your blessings
At Easter and all year, too!
Happy Easter
All shiny and new
To remind you of your blessings
At Easter and all year, too!
Happy Easter
These were a big hit with everyone! I share these things because I know many of you work with church groups. If you are like me, you are always looking for ideas for those groups. It seems to get harder each year to come up with new projects! So, I hope I have offered some inspiration for your next church gathering! If you have tried and true projects that have worked for you, please let me know! Maybe we should start a project idea swap! How fun!
I hope you have a great week ahead and you are blessed to meet with some Senior KeenAgers of your own! What a treasure!
Blessings to you,
Vicki
I hope you have a great week ahead and you are blessed to meet with some Senior KeenAgers of your own! What a treasure!
Blessings to you,
Vicki
Friday, March 26, 2010
Masculine Birthday
Greetings from Rocky Top! What an exciting night! Tennessee Volunteers (VOLS) just beat Ohio State and advanced to the Elite 8 in men's basketball! It is their first trip ever to this stage in the tournament! "I say I'm proud to be...a Tennessee VOL!!"
I thought it only fitting to share a masculine birthday card with you in celebration! As you may have noticed, I am loving working with the Kraft card stock! It is such a terrific background for so many colors! I embossed the card base with a Cuttlebug folder and sanded it just a little. I added the sentiment and the ribbon and done! Simple, yes....clean, yes....masculine, yes...Yep, I am done with this one!
Most of the men I send cards to only look at them once, say that's nice and put it down somewhere never to be seen again...LOL! Therefore, I see no reason to "glam it up" very much! The important thing is they were remembered and thought of enough to send a card, don't you think?
I am going to go clean up the mess I made now when the VOLS won, so, I will be back later! Blessings abound in Tennessee!! Hope everyone has a wonderful weekend!
Blessings to you,
Vicki
Thursday, March 25, 2010
Glitterbees Challenge Thankful
Hello Everyone!
Today I have a very special card to share with you! It is for the Glitterbees Challenge to use Teal, Peach and Orange hosted by Amy! Even more than the challenge, this card represents how thankful I am that a turn of events this week had a blessed outcome!
This past weekend my girls' father and my former husband suffered a heart attack. He made it to the hospital and after a battery of tests, it was found he had blockage in almost ninety percent of his arteries. This is a retired US Marine with a family history of heart disease. The sheer fact he made it through the attack was miraculous! He had quadruple bypass surgery on Wednesday and came through with his usual Marine style. Surgery was completed early with a very short recovery time and he was off the heart and lung machines, breathing tube out, sitting up and talking in less than three hours! Even though we are no longer married, we share two wonderful girls and he is very important to our lives. Needless to say, there was much prayer going on and stress levels were still high. We are all blessed that God's grace and mercy and healing are evident in our lives. That is why this card is even more special to me. I am so thankful for the blessings and love that covers me, my family, my friends, and, yes, even the man I was once married to. Thank you for letting me share this story with you and for all the prayers and good thoughts that came from my wonderful blogging friends!
I started with the deep orange card base and adhered DP stock from the DCWV Fun in the Sun Stack. I was a little perturbed that the base stock peeled even though it was scored. So, plan B was to distress all the edges! I was actually happy with the look afterwords. I punched an accent flower and added a button to the center. I also added buttons to the flowers printed on the DP stock. I used dental floss for thread in the buttons. I stamped the "Thankful" sentiment with a Fiskars stamp, which is a candy prize from Ms. Loretta, in Chestnut Roan Chalk ink.
I haven't decided what I am going to do with this card yet. My first thought (and the one I will probably go with) is to display it in my craft room as a constant reminder of all I have to be thankful for!
Sorry for the long post! I don't usually like to share too much personal info here, but I felt I needed to share this with you and maybe remind us all again of the many blessings we share in our daily lives! I hope you will visit again soon as I am planning a much more festive post the next time!! Have an awesome weekend and hug those you love with a little more gusto, OK??
Blessings to you,
Vicki
Wednesday, March 24, 2010
Happy Birthday, Mr.!
Hello Friends! I am sitting here listening to the birds sing and watching the sun come up...what a blessing!
Just a quick post about a quick card today. We always need masculine cards and never seem to have any on hand, so I am trying to fill my stash with a few.
I had this DP on hand and love it! So many great colors in there! I adhered it to Kraft card stock, added some ribbon and a decorative clip. The sentiment is stamped with Walnut Stain ink. I also used a strip of the paper on the inside of the card. I just want to say "Mister" when I look at this card!
Hope everyone has a great day!
Blessings to you,
Vicki
Monday, March 22, 2010
Spring Birthday
Happy Monday Everyone! Hope you had a great weekend! We were blessed with beautiful Spring weather!
I was inspired by the weather and the buds of the trees and flowers to use this butterfly patterned paper. I started with a white stock base and adhered the DP onto that. I stamped the sentiment and cut out with Nesties. The butterflies are cut with a MS punch from glittered card stock. I also added the paper flower with a gold brad center. I used cut outs from the DP to embellish the inside of the card.
A very simple and quick card but one I think says "Spring"!
Thank you for stopping by today! I hope Spring is on its way to where you are and you are enjoying sunshine and fair weather! Come back soon and be sure to leave your comments. I learn so much from your ideas and it makes my day to hear that you are enjoying what you see here!
Blessings to you,
Vicki
Friday, March 19, 2010
Step Friendship Box
Hello Friends! How is your day going? Good I hope!
I have a special project to share with you today! It is a Step Friendship Box! The "step" part is on the inside! Little mini drawers to fill with goodies and/or personal notes.
This was a rather lengthy project but one I love doing. I have made several of these and they are always a much appreciated gift.
I started with a piece of pink card stock which I stamped with a flourish image to make the background. I then cut cardboard panels to size and glued them to the backside of the stock. This step is much like covering a book or album. I chose a coordinating DP and covered the inside of the box. I made sure to leave space between the panels so the box would fold easily. I made the four drawers and attached them in "step" fashion to the inside. I used sticky strip for this to be sure I got a good hold.I also made a box for the top of the project. I then used my Cuttlebug dies to make the embellishments. The inside sentiment was computer generated. I added velcro closures to the overlapping panel to assure the box stayed squared and closed. The finishing touch was organdy ribbon tied around the box and into a pretty bow.
A tutorial for one version of this type box can be found at Life As Lou, She calls it a Magic Box. The version I like best came from a German website which is no longer available. If any of you would like a copy of those directions, I will be happy to mail it to you. The directions are in German but the dimensions and paper cuts are in English. You can figure out what they are doing from the pictures. Trust me, if I can do it, anyone can!! I used the basic instructions and created my own size of the box.
Thank you so very much for your visit today! You are always welcome here! Have a wonderful weekend and happy crafting!
Blessings to you,
Vicki
Wednesday, March 17, 2010
Designing DIVAS Challenge READ
Greetings from the Great Smoky Mountains! We are finally thawing out and seeing some wonderful buds on the trees! I so love Spring!!
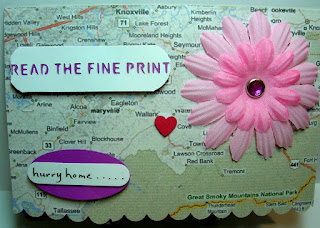
Today's card is for the Designing DIVAS Blog Group Challenge hosted by Gina. Gina challenged us to incorporate a theme of books or reading. Me being me, I had to go "off the chart" a little!
This card is going to my daughter who is in Germany for a few more months. They gave me the outstanding news that their new duty station will be Ft Knox, KY! That's only four or so hours from home!!! After three years in Germany, you can imagine how excited I am to have them so close!!
I started this card with a Kraft card stock base. I then printed a map of our area off the computer and adhered it to the base. I used my Cricut ( which was a gift from this daughter ) to cut out the sentiment. I wrote the "hurry home" with a CM fine marker and punched it out with the Word Window punch. I used an oval punch to make the matte layer. I then added the pink flowers with a purple gem brad in the center. The little red heart you see marks the place where we live. I also scalloped the bottom of the top layer to add a little interest.
This was a fun challenge and a fun card for me! I think I got the "read" part in there even if it is a map and sentiment!! You have to read a map, right?!?!? Yep! I thought so, too!
I hope you have enjoyed your visit here today! Don't be bashful and don't be a stranger...come on by any time!! After your first visit, you are no longer a guest, you know! On the second visit you become a friend and if you are a regular follower......well, shoot, you might as well be family!!
Many thanks to each of you for your time and for your comments. I treasure both!
Blessings to you,
Vicki
Saturday, March 13, 2010
Glitterbees Challenge Operation Write Home
Hello Everyone! Hope you are having a great weekend!
Our Glitterbees Blog Group has another challenge for us hosted by Cindy! Cindy's challenge was to make a card for Operation Write Home with a Father's Day theme. OWH is a wonderful organization that gathers handmade cards and sends them to our troops. It was an honor to make a card for this cause!
I started with a maroon card base and layered DP. I stamped the pocket watch with Walnut Stain ink, cut it out and added a brad for the watch arms. The sentiment is also stamped in Walnut Stain and cut out with Nesties. I added mini brads to the corners for a little extra oomph! A fairly simple card but one I think a soldier would like to send. I sure hope so!
I am so happy you dropped by today! I hope you will come back often! It's been a dry spell for me, but I think I have some juices flowing again! I always appreciate your comments and ideas so please let me know you were here!
Blessings to you,
Vicki
Friday, March 12, 2010
Sunshine Award
Hello Friends!
I have been blessed once again with a blog award! I am almost embarrassed to accept this one as it is a Sunshine Award and there has been very little sunshine on my blog in the last while.
I want to thank Jennifer for this award! Jennifer is an awesome young woman! She is stationed, with her hubby and beautiful daughter, in Germany for the moment. She also happens to live in the same apartment building as my daughter and family. Jen has gone past the neighbor status and worked her way up to "family". She is always there to help out and keeps the humor going when the duty is more than dismal! One of the hardest parts of the military life is having to say goodbye to such wonderful friends. So, Jen, there will be no goodbyes....just a "see ya later"!
I would like to pass this award along to some awesome blogging friends who always make the sun shine a little brighter in my days!
Karli- always a ray of inspiration
Carrie- makes my blog time so much sweeter
Micki- a ball of sunshine all by herself
Kathy- always takes the time
Monica-a light of hope and inspiration
Please take the time to visit these wonderful ladies and you will see why I appreciate them so much! Thank you for stopping by today! It is always a joy and a blessing for me!
Blessings to you,
Vicki
Subscribe to:
Posts (Atom)