
Showing posts with label seasonal. Show all posts
Showing posts with label seasonal. Show all posts
Thursday, December 24, 2009

Friday, December 18, 2009
A Merry Little Christmas
 Hello Friends! Have you missed me? I have certainly missed all of you! It has been a hectic time with holiday festivities and filling craft orders! Hopefully, I am all caught up now and can get back to doing what I love... sharing my craft fun with you!
I have a card to share today that took on a life of its own. I was using some holly leaves on a package and then several fell into a circle shape on my desk. The next thing I knew I had a wreath of holly leaves and the idea for this card. The leaves were punched with a MS holly punch from textured cardstock, I formed a wreath "base" by punching a 1 1/4" circle and then punching a 2" circle around the smaller one. I glued a series of leaves to the base. I then glued another series over and between the first ones. The berries are 1/8" circles punched and the bow is a foam sticker. I added crystal Deco writer to the leaves for a little extra dimension and texture. I used dimensionals to attach the wreath to the card base.
The card base is white stock with a red panel adhered to the inside right. I used a MS border punch on the outside edge. I also added the Deco glitter paint along the edge. The sentiment is stamped on white stock, cut with deco scissors and matted to a red rectangle with dimensionals.
I am really pleased with the look of this card! And I was thrilled to be able to use some of my many craft punches. Too often they sit by the wayside, but a crafter MUST have her tools, right?!?!? I knew you'd agree!!
Thank you so much for stopping by today! It is always so nice to hear from each of you! I hope to be a lot more faithful to my blog in the future! It has been a challenging time but one of great joy for me as we approach this blessed holiday. I want to wish everyone a Merry Christmas and pray that you will each find your own peace this wonderful time of year!
Blessings to you,
Vicki
Monday, December 7, 2009
Jumbo Paperclip Bookmark
 Hello! Welcome to Bountiful Blessings!
Just a simple little goodie to share today! I made several of these jumbo paperclips for a craft fair and to give out to friends.
I found the clips at Walmart in the office supply section. I punched two 2" scallop circles from white card stock. On one, I added a 3D snowflake sticker (I also found at Walmart in craft section). You could use any image or sentiment here. I joined the circles over the "open" end of the clip with glue dots. You can embellish further with ribbon but I chose to keep it simple. Glitter is beautiful but tends to make a mess for the recipient. Jewel brads and buttons are also very pretty. I packaged them in cello envelopes and added a printed topper which I stamped with snowflakes.
Quick, easy and beautiful! Gotta love it!
Have a wonderful day and I look forward to your return visit!
Blessings
 to you,
Vicki
Friday, December 4, 2009
Front Fold Gift Card Holder
Hello b logging friends!
I have another gift card holder to share with you! This one folds under a front flap and can also be for any occasion. I went with the Christmas theme and plan to use this one for a friend. You can view a video tutorial of this holder over at Dawn's Stamping Studio.
I started with white card stock and then added the Christmas paper. The present on the front is a chipboard piece adhered with dimensionals. The inside slot, punched with a word window punch, is shown beside the front of the holder. These come together very quickly and add a very nice touch to a gift card or money gift. You could even slide movie tickets into it!
Hope you have enjoyed seeing this version and you will come back soon! Have super weekend!
Blessings to you,
Vicki
 logging friends!
I have another gift card holder to share with you! This one folds under a front flap and can also be for any occasion. I went with the Christmas theme and plan to use this one for a friend. You can view a video tutorial of this holder over at Dawn's Stamping Studio.
I started with white card stock and then added the Christmas paper. The present on the front is a chipboard piece adhered with dimensionals. The inside slot, punched with a word window punch, is shown beside the front of the holder. These come together very quickly and add a very nice touch to a gift card or money gift. You could even slide movie tickets into it!
Hope you have enjoyed seeing this version and you will come back soon! Have super weekend!
Blessings to you,
Vicki

Wednesday, December 2, 2009
Holiday Wallet
 Hello and Welcome!
I wanted to dress up the usual gift card this year so I decided to go with some paper wallets for the male members of the family. The instructions for these has been around forever but Dannie Graves has an excellent video on this wallet that you can view here I started with black card stock and embossed the outer piece with the Argyle CB folder. It looks like worn leather IRL. Then I attached the inner pieces with double sided tape only on the outer edges. (Gosh, I love my ATG gun!) Sticky tape is also great for this project! I then rounded the corners of the outside piece. You can also pierce the outer piece all the way around and "connect the dots" to make really nice faux
 stitching. Once you have all the pieces cut out and placed in order, it is a simple wallet to put together. Just be sure to attach the OUTSIDE corners first! I made several and used warm rich colors to simulate the leather. I like this one especially because you can put in a gift card or cash (or check or MO or...oh you get the drift) or both. These are perfect for those gifts that need to be sent in the mail! I stamped the Holiday Wishes on white stock and cut out with deco scissors. I adhered it to the wallet with tape again as I wanted to keep it flat as possible for mailing. I have sold these at craft fairs and people are amazed how much like a real wallet it is.
Now that the grandkids are older and have almost EVERYTHING one could wish for, I decided a gift card or cash was in order. This project let me put in "Grandma's touch" and still make them happy! Bless their hearts!!
If you have any questions about this project or any other one on my blog, please email me. I would love to help if I can.
Have a wonderful week and stop by when you get the chance! I have several little gift items I will be sharing in the coming days. Just remember to take time for you and to be sure to reflect on the real reason for the season!
Blessings to you,
Vicki
Monday, November 30, 2009
Christmas Nail Ornament
 Hello Friends! Happy Monday!
Today I would like to share with you an ornament that I have made the past few years for friends and family. It is a printed poem and nail. The poem I print in multiple copies on white card stock. It prints with its own border so I just have to cut out. The nails used are masonry nails which you can get at Home Depot. There are several sizes and I chose to go with the large ones this year. I cut two slits in the stock and slipped the nail in. I then punched two holes in the top corners and added eyelets. This size nail is fairly heavy so I wanted to be sure the paper would not tear. I used craft wire to form the hanger and added two tiny red bows. You can also just use ribbon for a hanger if you chose. I can't provide a link to the poem page I print but if you would like a copy, email me and I will try to send the poem to you and you can use your print works of choice to make multiple copies in the size you want. Be sure to enlarge the pic so you can read the whole poem. It is a beautiful reminder of what the Christmas season is really about.
Hope everyone has a fantastic week! A busy one for me as the holiday festivities are beginning and there is lots of cooking to do! Combine that with the cards still to make and you have a bit of a frenzy! And I love every minute of it! Hope you will come by often and leave a comment or suggestion. It always makes my day to hear from friends!
Blessings to you,
Vicki
Sunday, November 29, 2009
Thankful Days !!
Hello Everyone! Hope you had a wonderful Thanksgiving! Ours was truly blessed as we gathered with dear friends and shared a delicious buffet feast! For those who could still move, we cleared the table and brought out the sales flyers! There were five pounds of those things in our local paper! Five pounds!! Imagine the trees we could have saved! But, being the people we are, we succumbed to the urge to shop! We made our lists and then made plans for Black Friday! We left at 4:30 AM the next morning and shopped til we dropped! Literally! We found a few bargains, but mostly just enjoyed ourselves looking and watching. There are going to be some very happy children come Christmas morning if what we saw is an indication!
I hope each of you had a fun relaxing time (once the food was served) and were able to be with ones you love for this very special holiday!
Even though we get caught up in the hooplah of the business world, we still take the time to share what we are thankful for. I am most thankful for my Savior who died for me that I may have eternal life. I am also thankful for the eyesight I have been left with. I so enjoy my crafting and cooking and seeing all those I love and hold dear. Which leads to my gratitude for each of you! You make my world such a better place with your love, support and inspiration! Each day is enriched by your thoughts, comments and suggestions! God bless you!
Now it's time to say goodbye to all our company....wait! That's a song, isn't it?!?! Sorry Mickey! Now it's time to concentrate on my favorite time of year. I love everything about the Christmas season! I love celebrating the birth of our Lord and the giving spirit we all share! I pray that each of you knows the beauty and peace of this holiday all year through!!
Blessings to you,
Vicki
I hope each of you had a fun relaxing time (once the food was served) and were able to be with ones you love for this very special holiday!
Even though we get caught up in the hooplah of the business world, we still take the time to share what we are thankful for. I am most thankful for my Savior who died for me that I may have eternal life. I am also thankful for the eyesight I have been left with. I so enjoy my crafting and cooking and seeing all those I love and hold dear. Which leads to my gratitude for each of you! You make my world such a better place with your love, support and inspiration! Each day is enriched by your thoughts, comments and suggestions! God bless you!
Now it's time to say goodbye to all our company....wait! That's a song, isn't it?!?! Sorry Mickey! Now it's time to concentrate on my favorite time of year. I love everything about the Christmas season! I love celebrating the birth of our Lord and the giving spirit we all share! I pray that each of you knows the beauty and peace of this holiday all year through!!
Blessings to you,
Vicki
Monday, November 23, 2009
Altered Mini Composition Book
Hello and Happy Mo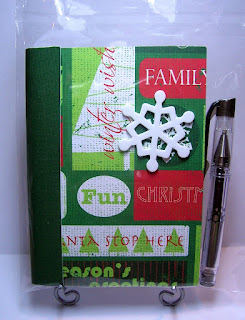 nday!
nday!
Today's project is a simple but fun way to welcome the Christmas season! It is a mini composition notebook that I altered with holiday papers. I started by measuring the front and back surfaces of the book. I have found that even the same company may not always have the same size books or pads. Each manufacturer has its own measurements. I cut the covers from holiday patterned paper and adhered it to the book with double sided tape. You could also use a liquid glue or gluestick. I like the tape because there is no drying time and it has a strong hold. I then measured a piece for the spine and adhered that as well. This was a contrasting piece cut from another pattern. I added a snowflake foam die cut to make the cover a little more festive yet keep the adornments simple so this could be carried in a purse or backpack without worrying about pulling off all the accents. I also included a mini gel pen that I purchased from Staples. Super simple but a great little gift for a friend or student and a great stocking stuffer!
Thanks for stopping in today and I hope each of you has a wonderful week and blessed Thanksgiving holiday!
Blessings to you,
Vicki
 nday!
nday!Today's project is a simple but fun way to welcome the Christmas season! It is a mini composition notebook that I altered with holiday papers. I started by measuring the front and back surfaces of the book. I have found that even the same company may not always have the same size books or pads. Each manufacturer has its own measurements. I cut the covers from holiday patterned paper and adhered it to the book with double sided tape. You could also use a liquid glue or gluestick. I like the tape because there is no drying time and it has a strong hold. I then measured a piece for the spine and adhered that as well. This was a contrasting piece cut from another pattern. I added a snowflake foam die cut to make the cover a little more festive yet keep the adornments simple so this could be carried in a purse or backpack without worrying about pulling off all the accents. I also included a mini gel pen that I purchased from Staples. Super simple but a great little gift for a friend or student and a great stocking stuffer!
Thanks for stopping in today and I hope each of you has a wonderful week and blessed Thanksgiving holiday!
Blessings to you,
Vicki
Friday, November 20, 2009
He's Checking His List Designing DIVAS Challenge
Greetings Everyone! Are you as glad as I am it's Friday? It's been a busy but fun we ek!
ek!
Today I have a card made for the Designing DIVAS Challenge. The challenge was to use a page from a book on your project. I went straight to the telephone book! Seeing the list of names made me think of Santa and his list. So, after some searching on line, I found this Santa image.
It worked perfectly for what I had in mind.
I started with a white card base and adhered the phone book page to that. Then I stamped the background with a "gifts" stamp. I layered the red card stock and then the black. The Santa was cut out three times and stacked with dimensionals for a 3D effect. I punched the tag and inked the edges with Real Red. The sentiment I printed. The Ho Ho Ho was stamped with another stamp. I glittered Santa's hat trim, beard and other trims with crystal glitter. I also glittered the outer edges of the card. It was close work, but I think I got all the DIVAS names on the list. If I missed someone. I apologize. I just couldn't write any smaller!!
Hope you have enjoyed this fun card. It brings out all the happy memories when I see Santa. I'm just hoping I don't get coal this year!!
Have a great weekend everyone and come back soon!
Blessings to you,
Vicki
 ek!
ek!Today I have a card made for the Designing DIVAS Challenge. The challenge was to use a page from a book on your project. I went straight to the telephone book! Seeing the list of names made me think of Santa and his list. So, after some searching on line, I found this Santa image.
It worked perfectly for what I had in mind.
I started with a white card base and adhered the phone book page to that. Then I stamped the background with a "gifts" stamp. I layered the red card stock and then the black. The Santa was cut out three times and stacked with dimensionals for a 3D effect. I punched the tag and inked the edges with Real Red. The sentiment I printed. The Ho Ho Ho was stamped with another stamp. I glittered Santa's hat trim, beard and other trims with crystal glitter. I also glittered the outer edges of the card. It was close work, but I think I got all the DIVAS names on the list. If I missed someone. I apologize. I just couldn't write any smaller!!
Hope you have enjoyed this fun card. It brings out all the happy memories when I see Santa. I'm just hoping I don't get coal this year!!
Have a great weekend everyone and come back soon!
Blessings to you,
Vicki
Monday, November 16, 2009
Happy Brrrr..thday!! Designing DIVAS Challenge
Hello Friends!
 Aaaah! It's so good to be back home again! No, I haven't left my house, but I did leave my blog for a while. Now, I feel like I have returned from a business trip! LOL!
Today I am playing catch up with some challenges and this is one we were asked to do in our Designing DIVAS Blog Group. We were to make a birthday card with a winter theme. I couldn't think of anything that says winter more than snowflakes!
I started with some blue cardstock for the base. I then layered it with white and cut the edges with deco scissors ( I am waiting for my scallop border punch to arrive!! ) Next is the patterned paper layer. I used my MS doily lace border punch for this one. The center snowflake is actually a 3D sticker I found at Walmart! I am not one to use stickers very much but these are awesome! Very well crafted! I continued the border theme on the inside of the card and used a sentiment stamp for the message.
It feels so good to be playing with paper and creating again!! Now if I can just get caught up on the challenges I have missed, I'll be a real "happy camper"! No wait a minute... Make that a real "Happy Crafter"!!
Thanks for your visit today and I hope you will come back again soon. I'll keep the coffee hot and the light on for you! Oh, if you go by a bakery blog on your way here, pick up a couple of treats, will you?!?!
Blessings to you,
Vicki

 Aaaah! It's so good to be back home again! No, I haven't left my house, but I did leave my blog for a while. Now, I feel like I have returned from a business trip! LOL!
Today I am playing catch up with some challenges and this is one we were asked to do in our Designing DIVAS Blog Group. We were to make a birthday card with a winter theme. I couldn't think of anything that says winter more than snowflakes!
I started with some blue cardstock for the base. I then layered it with white and cut the edges with deco scissors ( I am waiting for my scallop border punch to arrive!! ) Next is the patterned paper layer. I used my MS doily lace border punch for this one. The center snowflake is actually a 3D sticker I found at Walmart! I am not one to use stickers very much but these are awesome! Very well crafted! I continued the border theme on the inside of the card and used a sentiment stamp for the message.
It feels so good to be playing with paper and creating again!! Now if I can just get caught up on the challenges I have missed, I'll be a real "happy camper"! No wait a minute... Make that a real "Happy Crafter"!!
Thanks for your visit today and I hope you will come back again soon. I'll keep the coffee hot and the light on for you! Oh, if you go by a bakery blog on your way here, pick up a couple of treats, will you?!?!
Blessings to you,
Vicki
Sunday, November 15, 2009
Teacher Survival Kit
Hello Everyone! Well, I am living proof there is life after a craft show! You plan, prepare and plan some more and in a day, it's all done! Whew! It's definitely a learning experience!

The show I participated in was not a huge success for me in sales but I did enjoy the creative process. And, now I have plenty of gifts for friends! LOL!
One of the items I sold is this Teacher Survival Kit. A fun little goodie for those who work so hard. I made sure to include lots of chocolate for those energy spurts needed and to soothe those frazzled nerves!
This is a pillow box door hanger that I made from patterned card stock. Since the CS was white on one side, I folded over the hanger back to keep the pattern showing. I printed the contents of the kit on the computer and adhered that piece to the back of the box. The snowflake was cut with Nesties, glittered and adhered with double sided tape. I had some issues with the contents being too much for the box and putting excess pressure on the box seam so next time I do these I will shorten the list.
I will have other items to show in the days ahead. Like I said before, this was a learning experience and I have a much better idea now of what to include in any future shows.
Hope you all are having a wonderful weekend! I hope to get some rest and enjoy some non-assembly line crafting! It will be nice to relax and just go clean and simple for a while!
Thanks for stopping by and come back soon. I have missed my blog and my blogging friends while I was in "show mode". Now it's back to my normal craziness!
Blessings to you all,
Vicki

The show I participated in was not a huge success for me in sales but I did enjoy the creative process. And, now I have plenty of gifts for friends! LOL!
One of the items I sold is this Teacher Survival Kit. A fun little goodie for those who work so hard. I made sure to include lots of chocolate for those energy spurts needed and to soothe those frazzled nerves!
This is a pillow box door hanger that I made from patterned card stock. Since the CS was white on one side, I folded over the hanger back to keep the pattern showing. I printed the contents of the kit on the computer and adhered that piece to the back of the box. The snowflake was cut with Nesties, glittered and adhered with double sided tape. I had some issues with the contents being too much for the box and putting excess pressure on the box seam so next time I do these I will shorten the list.
I will have other items to show in the days ahead. Like I said before, this was a learning experience and I have a much better idea now of what to include in any future shows.
Hope you all are having a wonderful weekend! I hope to get some rest and enjoy some non-assembly line crafting! It will be nice to relax and just go clean and simple for a while!
Thanks for stopping by and come back soon. I have missed my blog and my blogging friends while I was in "show mode". Now it's back to my normal craziness!
Blessings to you all,
Vicki
Tuesday, November 3, 2009
Holiday Notepad
Hello and Welcome! I have been busy working on projects to sell at a craft fair in a few weeks. Time is slipping away but I am having a good time crafting!
One of the items I came across this week made me want to take a break from the craft fair items and try this notepad cover. It fits a jr. legal pad.
I got the instructions for this cover here. Just scroll down to post #2. It is all made from a reblessed 2 pocket folder. Those of you who know me well, know how excited I was to find this! Since my folder was rather on the wild side, I made a few adjustments to the original instructions. I completely covered my surfaces with ice green card stock. I then made a spine cover from some Christmas holly card stock. For the front I punched three ornaments with the SU ornament punch. The red one is dotted with green glitter pen to give it some sparkle. These are attached to the cover with dimensionals. I used narrow gold ribbon for the hangers and bows. I also covered the top of the pad inside with this decorative paper. This folder opens right to left, but you also have a folder that opens left to right with these instructions. Perfect for a left-handed person!
Hope you have enjoyed your visit here today! Feel free to look around and let me know what you think. And do come by often! There's no telling what I may post next!
Blessings to you,
Vicki
 Welcome! I have been busy working on projects to sell at a craft fair in a few weeks. Time is slipping away but I am having a good time crafting!
One of the items I came across this week made me want to take a break from the craft fair items and try this notepad cover. It fits a jr. legal pad.
I got the instructions for this cover here. Just scroll down to post #2. It is all made from a reblessed 2 pocket folder. Those of you who know me well, know how excited I was to find this! Since my folder was rather on the wild side, I made a few adjustments to the original instructions. I completely covered my surfaces with ice green card stock. I then made a spine cover from some Christmas holly card stock. For the front I punched three ornaments with the SU ornament punch. The red one is dotted with green glitter pen to give it some sparkle. These are attached to the cover with dimensionals. I used narrow gold ribbon for the hangers and bows. I also covered the top of the pad inside with this decorative paper. This folder opens right to left, but you also have a folder that opens left to right with these instructions. Perfect for a left-handed person!
Hope you have enjoyed your visit here today! Feel free to look around and let me know what you think. And do come by often! There's no telling what I may post next!
Blessings to you,
Vicki
Friday, October 30, 2009
Fall Fun!!
Hello and Welcom e!
e!
I wanted to share some of the goodies with you that were made for our Senior group at church. We had such an awesome time with music and fellowship!
We had these favors at each place setting.
The candy corn favor was made by cutting out the shape and then cutting color pieces for the front. The colors and spiritual reference on the back was printed with Print Shop on the computer and then cut to fit the shape. I put the candy corn in small zip bags and then layed it between the two pieces on a bottom piece.
The Happy Fall Y'all bag was printed from Alenka's Printables. I printed them on copy paper to make them easier to fold. Inside I put a zip bag with a Fun Fall Mix which consisted of dry roasted peanuts and the brown candy corn. Eaten together, it tastes just like a Payday candy bar. Some other names for the mix are Turkey Treats or Gobbler Goop!
I also made each one a pillow box door hanger and filled it with assorted candies and the single serve pouches of decaffinated coffee. These were made so they could "pass it forward" if they wished to. The hanger could be used again to leave a little something on someone's door. They are perfect for the nursing facilities and for those seniors that can't get around very well.
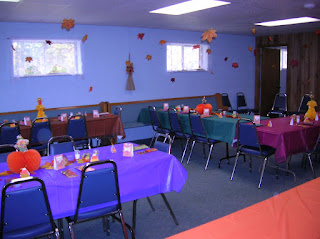
I also wanted to share some pics of our fellowship hall after it was set up for the dinner. We used multi-colored tablecloths in Fall colors and used Fall decorations for the centers. Each place setting had a napkin folded with cutlery inserted in the fold and the favors. When you serve buffet style, it is just easier to have the table set up so you aren't juggling plates, silverware and cups. We also had corn shocks in the corners with decorative ribbon, straw brooms decorated with Fall flowers and leaves falling from the ceiling. We took silk leaves, knotted them with fishing line in different le ngths and then wrapped the other end around a toothpick. The toothpick was placed under the ceiling tiles at the joints. It looked like the leaves really were falling.
And the colors made the room look wonderful.
Hope you may have been inspired to try one of our decorations. It is so much fun and makes folks feel really special. We'll be doing the room decor again for Christmas and I will try to share those with you once we have things set up.
Thanks for the visit! Come on back soon!
Blessings to you,
Vicki
 e!
e!I wanted to share some of the goodies with you that were made for our Senior group at church. We had such an awesome time with music and fellowship!
We had these favors at each place setting.
The candy corn favor was made by cutting out the shape and then cutting color pieces for the front. The colors and spiritual reference on the back was printed with Print Shop on the computer and then cut to fit the shape. I put the candy corn in small zip bags and then layed it between the two pieces on a bottom piece.
The Happy Fall Y'all bag was printed from Alenka's Printables. I printed them on copy paper to make them easier to fold. Inside I put a zip bag with a Fun Fall Mix which consisted of dry roasted peanuts and the brown candy corn. Eaten together, it tastes just like a Payday candy bar. Some other names for the mix are Turkey Treats or Gobbler Goop!
I also made each one a pillow box door hanger and filled it with assorted candies and the single serve pouches of decaffinated coffee. These were made so they could "pass it forward" if they wished to. The hanger could be used again to leave a little something on someone's door. They are perfect for the nursing facilities and for those seniors that can't get around very well.

I also wanted to share some pics of our fellowship hall after it was set up for the dinner. We used multi-colored tablecloths in Fall colors and used Fall decorations for the centers. Each place setting had a napkin folded with cutlery inserted in the fold and the favors. When you serve buffet style, it is just easier to have the table set up so you aren't juggling plates, silverware and cups. We also had corn shocks in the corners with decorative ribbon, straw brooms decorated with Fall flowers and leaves falling from the ceiling. We took silk leaves, knotted them with fishing line in different le
 ngths and then wrapped the other end around a toothpick. The toothpick was placed under the ceiling tiles at the joints. It looked like the leaves really were falling.
And the colors made the room look wonderful.
Hope you may have been inspired to try one of our decorations. It is so much fun and makes folks feel really special. We'll be doing the room decor again for Christmas and I will try to share those with you once we have things set up.
Thanks for the visit! Come on back soon!
Blessings to you,
Vicki
Tuesday, October 27, 2009
Spice Cake Pumpkin
 Hello everyone! Hope your week is going well!
I want to share with you today a pic of the cake I made for our Senior group function at church. Many there thought it was a fake and only for decoration! But it was a ready to eat cake.
I baked two bundt cakes and stacked them tops together. This was a spice cake pumpkin. I made the orange frosting and used the design on the cake to add texture to the pumpkin. The bottom border is English ivy leaves. The top is a combination of silk leaves and a real pumpkin stem. The stem makes all the difference! I have to admit that I got a pretty strange look from the produce guy when I asked for just the stem! He had a big grin and cut a stem for me. I explained I needed it for a pumpkin shape cake and he seemed relieved!
The cakes can be made well ahead and frozen if necessary. The frosting will last up to a month if kept tightly covered and refrigerated. I store all my frosting in zip lock bags and freeze any leftovers for the last minute cupcakes or cookies.
It was fun to see the reactions to this cake and one lady even winced when I went to cut it! The double cake makes for nice big slices so you may need a bigger plate than regular dessert size or flip one layer over the other when you plate it. You could also carve a face into the cake if you need a jack-o-lantern.
Thanks for stopping by today and letting me share some of the fun stuff I get to do besides paper crafting. Hope you will come back often!
Blessings to you,
Vicki
Wednesday, September 30, 2009
Autumn...
 Hello Everyone! We have been having sunshine again in the South and wonderful Fall temperatures! Blessings abound!!
The weather and the falling leaves inspired today's card. I started with a white card stock base and then used the leaf stamps from Simply Chic Autumn stamp set to create the falling leaves. They are colored in layers with Primas. The Autumn sentiment is from the same set. I layered that onto the green card stock piece with dimensionals. The brown rafia bow is centered with a glittered maple leaf brad from Spare Parts.
I was really pleased with the way the colors in the leaves came together. I have always enjoyed coloring and it is even more rewarding now that I have "big girl" pencils!
Hope your Autumn is blessed and beautiful!
Blessings to you,
Vicki
Saturday, September 26, 2009
For These Gifts

Hello and welcome to Bountiful Blessings!
I have a very simple card to share today, but one that says a great deal! I guess I am pushing for the Thanksgiving holiday a little soon. We are barely into Fall. I just couldn't resist using this new stamp and punch! I started with kraft cardstock and stamped a background with images from a new PSX stamp set. I then layered DCWV patterned paper from the Fall Indian Summer Stack. The sentiment is stamped on ivory card stock with an image from the same PSX set. It's hard to read in the photo but says "For These Gifts We Gtve Thanks". The place setting is a 1 inch punch in textured silver with a 1/2 inch circle punched from textured copper card stock. The spoon and fork are punched out also. The sentiment and the place setting are then punched with a scalloped oval punch and adhered with dimensionals. I rounded the corners and added faux stitching as an accent. I then added the brown organdy ribbon by cutting a slit in the side of the card. I really like this stamp set and I am fairly pleased with the colors and layout of this card. Thanks for allowing me to rush the season a little. But, when you think about it, we should be giving thanks every day and not wait for a holiday, right?
I am so glad you stopped by today and I hope you will visit often! It always makes my day to have you drop in! Feel free to stay a while and look around! You are never a guest, just a new friend I haven't met yet!!
Blessings to you,
Vicki
Subscribe to:
Posts (Atom)