Wednesday, September 21, 2011

Design D.I.V.A.S. OBG Blog Hop


Hello and Welcome to this month's Facebook Design D.I.V.A.S Oldies But Goodies Blog Hop!

The Facebook Design DIVAS (Divine, Inspirational, Virtuous , Artistic "Sistahs") is a group of crafters who love to share their inspiration, talent and fellowship! We have our "Oldies But Goodies" Blog Hop the third Wednesday of each month. Our challenge is to use products that
have been neglected or forgotten for at least six months. Be sure to mark your calendars and stop by each month to share in the fun! You are sure to see some amazing projects!

Carolyn Bounds starts our blog hop today! If you have come here from Carolyn's awesome blog, you are in the right place.

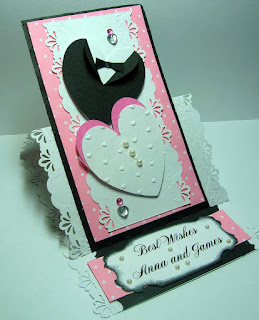
I have a fun easel wedding card to share with you today. I enjoy making this style card and the way it it is able to sit up for display. Dawn Griffith has a great video on how to make this card here! I started with a white card base. I then layered black, pink dotted swiss and another layer of white. The bride and groom hearts are also an inspiration from Dawn and her video for these can be found here. The base and white layer are cut with a border punch. The easel "stopper" is the same black, pink and white with the sentiment generated on the computer. The card has some added bling with pearls and clear adhesive hearts. There is a computer generated greeting inside the card. All the elements of this card more than meet the criteria for this hop! It has been an encouraging discovery to pull out the "oldies but goodies" for this challenge! It's still amazing what you can stockpile in a couple of years time! But, that is no surprise to any of you, right?

I hope you have enjoyed your visit here today! It is always a joy to have you stop by! You will want to continue the hop by visiting Maria Matter's blog! Maria always has wonderful projects to share! I am sure you will find inspiration at all your stops on the hop today! Join us again next month and I will continue to send...

Blessings to you,
Vicki Link

Tuesday, September 13, 2011

A Butterfly Blessing


Hello Everyone!

I'm here today to share the very sweet blessing sent to me by a dear blogging buddy! It is always a special treat to receive a blog award! Cindy Johnsen Pec has included me in the "Butterfly Blog" award! Thank you, Cindy! Sorry it took me so long to get this posted! Cindy is such a hoot! Her crafting is remarkable, her heart is warm and wide open to her friends and she's a nurse! Be sure to pay her a visit at Cindy's Antics Stamping, Scrapping, Nursing, Family! Oh, and be ready for the strange splashing sound on her blog! When I first heard it, I wasn't sure if I should try to catch something or jump into something!!

As with other blog awards, there are a few guidelines that come with the award. I have been asked to answer some questions.

Q1) Name your favorite color? Green

Q2) Name your favorite song? Victory in Jesus

Q3) Name your favorite dessert? Chocolate Chimichanga

Q4) What whizzes you off at the moment??? Politicians

Q5) Your favorite pet?
Oh, can't pick favorite...I love them all

Q6) Black or White? Depends if it is day or night

Q7) Your biggest fear? Falling

Q8) Best Feature? Hope it is my smile

Q9) Everyday attitude? Nothing God and I can't work through...

Q10) What is perfection? An unrealistic perception

Now, I am supposed to send this award on to ten other bloggers. Well, I can't! I can't choose just ten!! So, I am going to share this award with all my blogging buddies and hope they know how important they are to me! I have been so blessed with wonderful crafters who inspire me with their creativity and make my heart sing with their love and kindness!

I am so glad you stopped by today! I hope to have some paper projects posted soon, so, be sure to check in later! Hope you have an amazing week! I will leave you now with...

Blessings to you,
Vicki

Monday, August 29, 2011

No Tragedy Here

Hello Friends!

Quite the weekend for the East Coast, huh? Hope everyone came through with little or no damage or injury!

I want to share a card with you today that was made for my nephew. He is a wonderful guy who I dearly love! He has been in the theater many years wearing many "hats"; actor, writer, singer, dancer, you name it! To hear him talk in his soothing Southern drawl warms any heart! But, to see him on stage and speaking a whole different dialect and expressing a completely different persona just blows me away! For his birthday card, my thoughts immediately went to the theater masks, comedy and tragedy.

I started with a standard size card base in Brilliant Blue. I rounded the corners of the base as well as the gold mat layer. Having no stamps for the masks, I went to the computer and found the clip art. I only used the comedy mask for this card. I printed those images twice, cut them out and layered them on the card with dimensionals. I printed the greeting, also on the computer, using Print Shop. Next, I sponged the edges of the greeting layer with some Brilliant Blue ink. As a final accent, I added some copper colored adhesive pearls. I am happy to say he loved it!

I always seem to enjoy the cards made for family much more, don't you? I love crafting cards, but those going to family and friends just make me enjoy the process in a different way!

I am so glad you stopped by today! Hope you have enjoyed your visit and will come again! Who knows which relative or friend's profession I will zero in on next?!?!?

Have an awesome day and know I am sending...

Blessings to you,
Vicki


Wednesday, August 17, 2011

Design DIVAS Oldies but Goodies Blog Hop


Hello and welcome to the August Design D.I.V.A.S. Oldies but Goodies Blog Hop! Our challenge for this hop is to use items in our project that are at least six months old. I know we all have some of those in our crafting supplies!! If you have arrived here from Dru's blog, you are in the right spot. To start at the beginning of the hop, be sure to go to Heather's blog.

The card I am sharing with you today is made up of all "oldies but goodies". I made this card for a friend's great niece. That fact will be important later!

I started with the dress template I found here. It is precious and reminds me of the dresses my girls wore when they were babies. This is a two part template so the variations for this piece are endless. I started with a white cardstock base and covered it in wallpaper. Tacky glue works really well for adhering the wallpaper to the base. For the front, I also cut a vellum overlay which I then embossed with a Cuttlebug folder. I sponged the dress edges with rose colored chalk ink. The trim around the top is bakery twine in a coordinating color. At the bodice line, I added a strip of pink grosgrain ribbon. The buttons are actually from my friend's collection! I wanted to include a little heritage in the card! I think it is so neat that we could include the great aunt's buttons! The sentiment strip was computer generated and cut with design scissors. I also used the scissors to cut the bottom edge of the dress. As a final touch, I added a tiny satin bow with the tails falling down the front of the dress. The card opens at the bottom; so if your cardstock or paper has a definite pattern, you will need to cut the fold at the shoulder in order to keep pattern going in the right direction. I also had to make the envelope for this card as it did not fit standard sizes. This card is a little time consuming, but definitely worth the effort.

I hope you have enjoyed your visit here. It is such fun "hopping" with these talented ladies! Your next stop is Mary Harmon's blog. I know you will be inspired by what she has to share!

Thanks so much for stopping by! We hope you will join us again for our next hop the third Wednesday in September!

Blessings to you,
Vicki


Saturday, May 21, 2011

Two from One Design!


Hello Friends!

Today I would like to share a couple of cards made using the same DCWV cardstock design. Once again, I have gone to my favorite Fun in the Sun pack! This has become one of my favorites due to the double sided designs and the touches of glitter on the cardstock.

My maternal grandmother was a tiny lady with a big heart. One of her favorite sayings when we washed the dishes was, "While you have that hot wet rag, how about wiping down this...or that!" She managed to get her entire kitchen cleaned that way!! We use that phrase still today and I was reminded of it when I had this cardstock out. So, while I had this big piece of cardstock out, why not make two cards??

The anniversary card is standard size. I cut the outside edges with Majesty design scissors. The greeting layer is cut with Spellbinders Scalloped Rectangle die and stamped in Really Rust craft ink. The edges are sponged with Ballet Blue ink. I added copper pearls for accent as well as the heart gem brad. I used the SU Bird punch to add some extra interest with the bird and branches. The bird's eye is also a copper pearl. Simple and fun with this card!

The second card was made for my daughter's friend. Military wives are so awesome about encouraging and supporting each other! She needed a card just to say she appreciated her friend's efforts and prayers. Same standard base as before. The greeting is stamped on a strip of GP white cardstock and cut with an MS border punch. The flowers are from a K & Company pack. The centers on the flowers were yellow so I went over them with a copper glimmer gel pen and added the white dots. You are gonna laugh I know, but I thought you would get a kick from the fact that I used the little dot cut outs from the border punch on the flower centers!! How's that for recycling?!?!? The flowers are adhered with dimensionals. I added a rust colored ribbon to soften the card a little and rounded the lower corners. Here again, simple and fun!

I hope you are all enjoying your weekend and you have enjoyed your visit here today! Please come back soon! And, remember....put that hot wet rag to good use while you have it!! Hugs and...

Blessings to you,
Vicki

Wednesday, May 18, 2011

Design DIVAS OBG Blog Hop!!


Hello and Welcome to the Facebook Design DIVAS OBG Blog Hop! So glad you are here! If you came here from Mary Griffith's blog, then you are in the right place! If you would like to start at the beginning of the hop, head over to Cindy Grigiski 's blog!
Link
The Facebook Design DIVAS (Divine, Inspirational, Virtuous , Artistic "Sistahs") is a group of crafters who love to share their inspiration, talent and fellowship! We have our "Oldies But Goodies" Blog Hop the third Wednesday of each month. Our challenge is to use products that have been neglected or forgotten for at least six months. Be sure to mark your calendars and stop by each month to share in the fun! You are sure to see some amazing projects!

My project to share today is a masculine birthday card. These always seem to be needed and seem the hardest to come up with. This time I needed a card for my son-in-law. I even got excited when I came across a stamp set I had not used in quite some time! I started with a card base from My Mind's Eye. I love the brown and blue together for a masculine card! I found some matching cardstock in my stash and stamped/clear embossed the lighthouse in Night of Navy craft ink! This image is from The Angel Company's "Light the Path" set. I then stamped and embossed the birthday greeting from the Inkadinkado's "Greetings" Collection. I cut the image and greeting down to size with scalloped scissors. Next, I cut the mats and sponged all the edges with the craft ink. I also added the Making Memories "Metal Sayings" sticker for some extra interest. The last detail is some baker's twine in Cappuccino color. Then I adhered the image and greeting to the card with dimensionals. I hope you like the result! I was pleased to see these older products come to life again!

Thanks so much for stopping by today! It is always a treat to have you here! Now, you will want to hop on over toDru Cabral's blog! She always has the neatest things to share!

Hope you enjoy the hop and I leave you with...

Blessings to you,
Vicki

Friday, May 13, 2011

Vintage Birthday!


Greetings to all! Ready for the weekend? We were looking forward to some cooler weather but looks like we are going to have the storms to come with it! Crazy Spring here in the mountains!

I have a birthday card to share with you today. This was a true labor of love as I made it for my best friend, Mary! She is such an awesome lady and my "rock" for several years now! I hope all of you have someone in your life that is your "Mary"! It is such a blessing!

Mary likes vintage styles, and her favorite colors are pastels. I tried to incorporate those "likes" in her card. I started with some wonderful double-sided cardstock from DCWV's "Fun In the Sun" collection. I cut the 12 x 12 sheet to 8 1/2 x 11 and made a half fold base. I used the tree branch stamp from the SU "Easter Blessings" set and Color Box Chalk ink in Warm Violet to stamp the background. I then cut the top layer edge with a Martha Stewart border punch. I rounded and distressed all the other edges. The greeting was cut and embossed from the same stock with the Spellbinders "Peony" die and then stamped and clear embossed with the a Stampede "Elegant Birthday" stamp. I outlined the embossing with a pink glitter pen. The ribbon trim is an Offray ruffled white satin. I also used the white ribbon to make the flowers. I embellished the flower centers with petite flower brads. The flowers are very easy to make with the ruffled ribbon. It is just curled in a spiral with glue dots to hold it all along. These are attached with glue dots also. To "bling it up" even more I added a jeweled hat pin and ribbon slide from Making Memories. The heart "Gemstones" are from Paper Studio and the pearls are from K and Company. I found a wonderful poem for the inside of the card and thought you might have a "sister" in your life you would like to share it with.

You may see me use more of the ruffled flowers all along as they are so easy to make and ruffled ribbon comes in so many wonderful colors. I don't know about mailing a card with these flowers. I hand delivered this card, but I know there is extra postage required to mail a half fold card. I was also told that any card that is too thick to go through the machines is charged extra. I just don't think I would risk mailing a card with these flowers and beads on it.

Well, my four legged babies are telling me I have said enough(they want to go out), so I will leave you with a wish for a wonderful weekend and, as always...

Blessings to you,
Vicki

Friday, April 29, 2011

Happy Birthday, Mister!


Good Morning Friends!

Yay! The weekend is here! After a terrible weather week here in our area, I am looking forward to some calm Spring weather this weekend! Beautiful today with sunshine and a cool breeze! Even the animals seem calmer and happier!

I had been asked to create some masculine birthday cards. Today I would like to share one of them with you. I tend to keep masculine cards simpler but with an extra touch or two.

This project started with a My Mind's Eye card base. This particular base put me in the mind of a man's vest. Keeping it simple, I rounded the outside corners and sponged the outside edge with Really Rust craft ink. The pocket watch is stamped in the same ink and outlined with gold metallic pen. The "hands" on the watch are tool brads. I used a Hero Arts stamp for the greeting and used the Cuttlebug and Labels Four die to cut it out. I also used the gold pen around this layer. The sentiment inside was computer generated. I thought about adding more embellishments but decided I liked the clean look for an older gentleman's card.

I hope your week has gone well! Are you ready for a new month and Mother's Day? I sure am! April has been hectic to say the least! Spring really came in like a lion for us this year! Now I am ready for some "lamb" days!

Thank you for stopping by today! Your visits always bring a smile and leave me with a happy heart! Please come back again soon!

Blessings to you,
Vicki

Monday, April 25, 2011

Blog Blessing from Susan


Hello Friends!

I am feeling pretty spiffy right now! A new friend and now blogging buddy, has blessed me with a blog award! Thank you, Susan! Be sure to check out Susan's blog, Cricut and Grasshopper! She has wonderful cards, layouts, tips and projects on her blog!

There are a few goodies that come along with this award.
The rules for the Stylish Blogger Award are:
1. Thank the person who gave the award, and link back to their blog.
2. Share 8 things about yourself.
3. Pass this award to 8 individuals.
4. Leave a comment so they can pass on the recognition

I have no problem with #1, 3, and 4. It's that #2 that gives me pause. Oh, I can share 8 things; but, I am afraid they aren't anything news worthy...lol! So, in the spirit of the award....

1. I am Southern born and love it! If I can't remember someone's name, it's ok! You are all "Honey" and "Sweetie" to us anyway!
2. When I am not in the craft room, I am in the kitchen. Cooking is my passion!
3. My pet peeve is lack of manners! It takes so little to be respectful and nice to people.
4. I am one of seven generations to live in "the ol' home place". Yep, I live in a house that's over a hundred years old! The windows rattle, the floors all slope (in different directions) and some of the window sills are a foot deep where the windows were cut out of the logs!
5. I have worked in many and varied fields, but my favorite is "professional volunteer"!
6. I would love to own and operate my own tea room!
7. I am a tool junkie!
8. God is most important in my life! Only with His love and grace can I do all other things!

Now, to pass this along to eight other friends! It's hard to narrow down the list. So many of my blogging friends qualify for this award!

1. Mary Griffiths - http://mystampinhide-away.blogspot.com/
2. Peggy Marsh -http://thewiredangel.blogspot.com/
3. Maria Matter-http://joyfulstamper.blogspot.com/
4. Karen Howe Murray-http://www.papercraftmemories.com/
5. Gina Flowers Lindsay-http://ginasmakingsandmusings.blogspot.com
6. Carrie Clovis Lipovich-http://stampsscrapsandscissors.blogspot.com/
7. Chris Dickinson-http://www.chrissyd723.blogspot.com/
8. Sue Walsh-http://a-consuming-passion.blogspot.com/

These ladies all have awesome blogs and amazing talent! Now, Ladies, don't hate me for sending you this award! You deserve it and I am looking forward to reading about you!! And, yes, I understand payback is the dickens...lol!

I want to thank Susan again for including me in this award! She sure knows how to make a girl feel special!

Thanks to all of you for stopping by! Always a treat to have company! Hope everyone has a great week filled with many blessings!

Blessings to you,
Vicki

Wednesday, April 20, 2011

Design DIVAS OBG Blog Hop


Hello and Welcome to the Facebook Design DIVAS OBG Blog Hop!

The DIVAS are an eclectic group of ladies who love to fellowship and craft. We have this blog hop the third Wednesday of each month. We hope you will join us today and come back in the future to share in our fun and inspiration!

The theme for the hop is Oldies but Goodies! Our challenge is to use materials that are at least six months old and, more than likely, sadly neglected over time.

This is your first stop on the hop today and my card meets the criteria for the challenge from start to finish! I know sympathy cards are not ones we like to make necessarily, but they are needed for those we want to share our love and sympathy with.

I started with a white card base and layered patterned paper on the front. This paper has a beautiful floral pattern and I used a gold pen to outline and raise the flowers. I used a scalloped edge punch for the sides and distressed all the edges. The sentiment is stamped on parchment paper and cut with the Spellbinders long rectangle die. I added the birds in flight as an extra touch. This card is a little more subtle than I usually make, but I thought this paper was perfect for a sympathy card.

Your next stop on the hop is Melissa Cash. Please be sure to stop by and leave her some love!

Thanks so much for your visit today and we look forward to hearing from you!

Blessings to you,
Vicki

Wednesday, March 23, 2011

Design DIVAS OBG Blog Hop

Hello Friends!

Welcome to the March Design DIVAS OBG (Oldie But Goodie) Blog Hop! So glad you could join us!

If you came here from Brenda Turner's blog, you are in the right place! If you would like to start from the beginning of the hop, you can start with Melissa Cash's blog!

The idea for our blog hop is to use items in our craft stash that have not been used for at least six months! I think my project today more than meets that criteria!

The birthday card I am sharing today started with a half fold white cardstock base. My next layer on the card is my OBG, wallpaper! I have had this piece in my stash for over a year and was thrilled to see it go to good use! It is a beautiful heavily textured and embossed piece. I can't imagine it on a wall. but I love it for this card! I used a vellum overlay on the card to soften the image. I then stamped the sentiment on the vellum and embossed with white powder. The inside greeting was computer generated! I finished the card with a ruffled pink ribbon. I had quite a bit of difficulty photographing this card due to its size and texture. This is definitely one of those cards that the picture does not do it justice!

I hope you are enjoying your visit here and have found some inspiration along the way! This group of crafters are amazingly talented and such a wonderful group to share ideas with. We are becoming quite close and are enjoying our journey together!

Your next stop on the hop will be Shelly Schmidt! Shelly always has unique projects with a great eye for color and detail! Be sure to join us next month for our OBG Blog Hop! You never know what these ladies may pull out of their stashes to share with you!

Hope you are having a terrific week and I leave you with...

Blessings to you,
Vicki


Monday, March 14, 2011

Heartfelt Thank You

Hello Friends!

I hope you have been having a great weekend! We were blessed with much warmer temperatures and sunny skies! Just beautiful!

I have a very simple card to share with you today. It is part of a set I put together for a friend. I started with a cardstock base made from the K&Company Life's Journey stack. Beautiful design on both sides. I added a piece of ribbon from my bridal floral stash. The sentiment is stamped with Mellow Moss on white cardstock, embossed with clear embossing powder, and cut with Spellbinders Labels Nine die. I like the little heart at the end of the flourish on this stamp. This layer is adhered with dimensionals. I sponged the edges of the sentiment and the card with Mellow Moss. I finished the card with a computer generated greeting inside. I love the elegance this cardstock gives to the card! I must have been born in the wrong generation! I can't seem to get too far away from vintage type cards!

I have a busy week ahead, but hope to get a chance to visit some blogs and leave some love! We may be on longer daylight hours, but the hours still seem too short for me to get everything in a day I would like to! Thank you so much for taking the time to stop by today! It feels so good when we can share time together!

Love and blessings to you~
Vicki
Posted by Picasa

Sunday, February 27, 2011

Dog Food Die Cuts

Hello Friends!

Hope you are having an awesome weekend!

Today's post may seem a little strange when you read the title! No, I didn't die cut dog food! (Not yet anyway!) But I did think "outside the bag" for this project! Let me give you some background info so you won't think I have totally lost it! ( No comment from those who know me well, please)

My BFF Mary and her hubby have asked me on occasion to babysit my dogniece and dognephew, Susie and Max, for them. This time, their anniversary fell during there time away.

You have to understand, with my three dogs and their two, it is a cute circus at times in my house! Thankfully, they all get along well! More thankfully, they all eat the same dog food! This is a real plus when you have five eating at the same time! NOW, Mary's favorite colors are pastel blue and pink! One night while I was feeding the dogs, I looked at the bag, and guess what?!?! Those colors were on the bag!! Well, me being me, the concept for their card was established!! Perfect sense, right???

I got the animals fed, out to potty and settled in for the night. Then I began to cut apart their dog food bag! They were a little confused, but full, so they left me alone with the bag! I cut panels from the bag to fit my Cricut mat. I used the Daisy from the Walk In My Garden cartridge to start cutting flowers from the bag! Well, the bag had a coating, kind of like freezer paper on it. My cuts were sliding all over the place and I was almost crushed that I would not be able to use my awesome (to me) idea for their card. Then I was blessed with an AHA moment! I have the spray for renewing your mats! I sprayed the panels before putting them on the mat and it worked beautifully!! I was so tickled, I woke the dogs when I uttered a very loud, "YES!!" Once again, they looked up, gave me the "she's lost it again" look and resumed their naps.

After cutting out various sizes of the flower, I layered them to resemble Mary's favorite flower, the Dahlia. I think I got pretty close! I punched the centers of the layers and bound them with a large gem topped brad. Whew! It worked! Now, what to do next?!?!

I decided to go with a craft colored base. I had to get something in there for hubby! I used some DCWV Spring paper for the background, cut the sides with a border punch and edged it with a Versamark pen, and embossed the edge with copper powder. I stamped the sentiment with Versamark on some coordinating paper from the same stack. I then embossed that with the copper powder also. I used a Spellbinders Fancy Tags die to cut out the greeting. I also embossed the ends and edges of the tag. Now it was time to put it all together on the base. I used some leaves from my floral stash to accent the flower, which is attached with glue dots. The sentiment is mounted on dimensionals. I added a computer generated greeting inside, rounded the corners, and called it "done"! I wanted to dress up the envelope a little so I stamped the flying bird with Versamark and embossed it in the copper also. The bird represents them being away and going to Florida as "snowbirds" to get away from the cold! I know, I'm awful!

I hope I didn't bore you with my journey through this project. I just felt I might need to explain myself a little. Who am I kidding? If you follow my blog, you know this is typical of me, right?!?!
I know Mary will get a big kick out of it and that is what I was after! She and Don have been wonderful to me and are always there to give me rides, fix my broken house, or just give me a boost when I need it! I love them dearly!

If this post starts your week off with a chuckle or a sigh (sympathy for my friends...lol), then I am happy! It makes my heart sing when friends drop by and check out my latest craziness! Thanks so much and come back again soon, won't you?

Love and hugs to you all.. and .....

Blessings to you,
Vicki

Wednesday, February 16, 2011

Welcome to the Design D.I.V.A.S. Oldies but Goodies Blog Hop


Hello and Welcome! Design D.I.V.A.S. on Facebook is a private group of crafters who love to share fun and inspiration! Our Oldies but Goodies Blog Hop was created for us to share some of our "back of the drawer or cabinet goodies" with everyone! We are to use craft items that have not seen the light for six months or more.

If you have arrived here from Sharri Seffens blog, you are in the right place! This stop is the last one on the hop! If you would like to go to the beginning of the hop, please start with Brenda
Turner's blog!

I didn't have to dig too deep to find items that meet the criteria for this hop! I went "back in the day" with some tools and stamps that have sadly been neglected for more than several months.

I started with a cranberry cardstock base. I then added borders cut with the Cuttlebug Floral Borders die. The tiny blossom accents were also cut with this die. Next came the inside corner accents cut with the CB Vintage die. I distressed all the edges of the card, rounded the outside corners and sponged them with Color Box Chalk Warm Violet ink. The sentiment layer was stamped and then cut with Spellbinders Label One die. I sponged the edges here, too. The panel was then adhered with dimensionals. Next, I added the multicolored butterfly, cut with the Sizzlits Butterfly Tag die and mounted it with glue dots. As a final accent, I edged the sentiment panel and the butterfly with DecoArt Twinkles Glitter Paint. I also added the glitter paint to the flower blossoms.

This is just a fun card to send to a good friend recovering from surgery. She is a very dainty lady and I thought the borders and bling would be perfect for her.

I hope you have enjoyed your stop here today! I am the last blog to visit on this month's hop. If you have not visited all the members in the hop, please start with Brenda's blog and soak in all the wonderful talent and inspiration these ladies offer! We will be doing this hop again the third Wednesday of each month so be sure to join us!

You are always welcome to drop by here whenever you can! You may start out as a newcomer to my blog, but I hope you will feel like a friend when you leave! For those of you who visit often, you bless me with the gift of your time and friendship!

Hope everyone has an awesome day and, as always, I send...

Blessings to you,
Vicki

Sunday, February 6, 2011

Cricut Birthday Roses

Hello Friends!

Hope everyone is having a good weekend and thawing out from our serious snows! I was kind of sad to see all the snow melt away. Everything was so beautiful in that blanket of white!

Today, I'd like to share with you a card project made for a very special lady! Her mother actually ordered the card; but, bless her heart, the mother gave me the freedom to create anything I wanted. I love it when I can let go the reins and just create!

I started with a half-fold card base (5 1/2 x 8). I used DCWV cardstock and cut it down to size. Most of the vintage floral is covered, but it still made for a beautiful background. I then cut the outside edge with a Fiskars border punch. I distressed all the edges and sponged them with SU Old Olive ink.

I knew I wanted to do a floral bouquet on this card, but I wasn't sure how I wanted to display it. I decided to go with a nosegay look, so I gathered some lace trim and attached it to the card with Quick Dry Tacky Glue. I also chose to use roses as the flower. These were cut with the Cricut "Walk In My Garden" cartridge. I used the blackout feature to cut the base of the rose head in a soft pink cardstock. I cut the top of the rose in a darker shade of pink. This is where I started playing until I was happy with the look! I went ahead and put the rose together with foam dimensionals. Then, I sponged on SU Pink Passion ink. Not happy with that result, I went over them again with Warm Violet Brilliance ink. They still looked too "new" for the vintage style I wanted, so I went over them again with SU Really Rust. And, yes, the paper held up well through all that!! I decided I wanted some shimmer on them, so, I added some Kaleidoscope embossing powder by dabbing them with some Boss Gloss embossing ink. I had to be careful with the heat tool so as not to melt the dimensionals. I got a little shimmer, but I just wasn't happy with the look yet. As a final step on these "dried" roses, I decided to emboss once more with clear powder. Voila! I finally liked the vintage look that came through! I am sure there are many ways I could have achieved this "color" but I had fun with this! I attached the roses in a bouquet pattern with dimensionals. For the stems, I doubled floral wire and covered them in green satin ribbon. These were attached under the roses with the tacky glue. I made a simple multi-loop bow with seafoam green satin ribbon and attached it with glue dots. I used a pearl head corsage pin with a heart cross charm to also anchor the bow. As an extra removable accent, I stuck in a beaded hat pin. Whew! I was finally happy with the finished bouquet! I know, I know...a little anal wasn't I?

For the sentiment layer, I stamped the greeting with Versamark and heat embossed it with gold powder. I used a Spellbinders Label 9 die to cut the panel. The "daughter" is a gold sticker. I sponged the edges with the Old Olive and attached the layer with dimensionals.

The inside of the card was very simple. I let the pattern of the paper do the "work" inside and added a computer generated "Daughter" greeting.

Now, with all those layers and the overall dimension of the card, I had to come up with a "cover" for it. I had no envelope that would hold the thickness, so I made a box for it. I used coordinating cardstock and the card as a template. I cut the top of the box the same way only 1/8 inch bigger to cover the base. I tied a green satin bow around the box and it looked so pretty. Sorry, but it was delivered before I could get a picture of the box.

This was a total labor of love for a very special friend! Thankfully, she loved it! She even loved the box!! And that's why I love what I do! To know someone appreciates your work is so rewarding! Don't you think so?

I hope all of you who were interested survived the Super Bowl! I'm off to play some more with paste and paper!

Thank you so very much for stopping by today! The gift of your time and your comments are greatly appreciated! Hope you will come again! I leave you now with...

Blessings to you,
Vicki

Friday, January 7, 2011

Blue Birthday Greetings

Hello and Welcome!

Just a quick post today to share a birthday card. I started this project using a blue floral card base. The layers were created using white card stock cut with the Cricut. (Forgive me, but the cart for this layer has left my brain completely.) I outlined the border of this layer with a silver gel pen and added pearl accents. The Flower T was cut with the Songbird cartridge. The bow is a little goody from my stash! The sentiment layer is a rectangle with the corners punched using a filigree punch. The Happy Birthday was stamped with Versamark and then embossed with silver powder. A tiny pearl was used to dot the"i". The layers and flower were raised on dimensionals. I used a white gel pen for faux stitching all around the card and layers. For the inside of the card, I used computer generated sentiments on layers cut with deco scissors and a border punch. I added a stamped heart outlined with the white gel pen again as a last touch.

As you can see, this card was designed for the daughter of a dear friend. I seem to always have greater inspiration if I know the recipient of the cards I make, don't you?

I hope everyone's New Year is getting off to a great start! The weather has been a big factor for us this year. We're seeing more snow than we have in many years. I love it, but I feel so bad for those who have to drive in it. These first few days of the year also bring back memories of my grandmother who grew up in these hills and lived by the proven statistics of her life. She would record the weather for the first twelve days of January and then predict the weather for the twelve months of the year! I was amazed by how accurate her predictions always were! We can be skeptical of these mountaineer or hillbilly visions, but they used every aspect of their surroundings to provide a better chance of survival for their families. And it worked!!

Thank you for stopping by today! I hope you enjoyed your visit and will come by again soon! It is always a joy to have folks drop in! I am off to see if I can predict what will be missing from my kitchen after I eat!! I leave you with.....

Blessings to you,
Vicki