Hello Everyone! We are doing the Happy Dance with the Sweet Dreamers as one of our own has given birth to a baby girl! It's so exciting! Welcome Lilah Marie!
The card I made for the occasion was a labor of joy! Pun intended!
I used a white card stock base and then layered the pink stock that was stamped with a flourish stamp. I also dry embossed this layer with the D'vine Swirl folder and cut the corners with a deco punch. The black layer was stamped with an image from PSX and cut out with a Labels Four Nestie. I used deco scissors to make a white layer in between. The black layer was also sponged with craft white ink. The sentiment I printed on a ribbon tag cut with Nesties. I threaded white organdy ribbon and attached it to the card with dimensionals. I then punched two small holes at the top of the black layer and inserted the white ribbon again for a bow.
It is so much fun to be creative when you have such a blessed occasion to celebrate! Now we want to see pics of the little one!
Thanks for stopping by and sharing in our celebration! Hope you will come back often!
Blessings to you,
Vicki
Saturday, October 31, 2009
Friday, October 30, 2009
Fall Fun!!
Hello and Welcome!
I wanted to share some of the goodies with you that were made for our Senior group at church. We had such an awesome time with music and fellowship!
We had these favors at each place setting.
The candy corn favor was made by cutting out the shape and then cutting color pieces for the front. The colors and spiritual reference on the back was printed with Print Shop on the computer and then cut to fit the shape. I put the candy corn in small zip bags and then layed it between the two pieces on a bottom piece.
The Happy Fall Y'all bag was printed from Alenka's Printables. I printed them on copy paper to make them easier to fold. Inside I put a zip bag with a Fun Fall Mix which consisted of dry roasted peanuts and the brown candy corn. Eaten together, it tastes just like a Payday candy bar. Some other names for the mix are Turkey Treats or Gobbler Goop!
I also made each one a pillow box door hanger and filled it with assorted candies and the single serve pouches of decaffinated coffee. These were made so they could "pass it forward" if they wished to. The hanger could be used again to leave a little something on someone's door. They are perfect for the nursing facilities and for those seniors that can't get around very well.
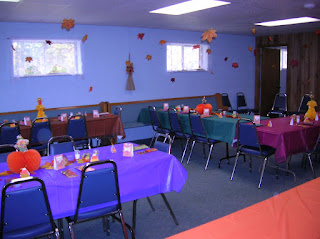
I also wanted to share some pics of our fellowship hall after it was set up for the dinner. We used multi-colored tablecloths in Fall colors and used Fall decorations for the centers. Each place setting had a napkin folded with cutlery inserted in the fold and the favors. When you serve buffet style, it is just easier to have the table set up so you aren't juggling plates, silverware and cups. We also had corn shocks in the corners with decorative ribbon, straw brooms decorated with Fall flowers and leaves falling from the ceiling. We took silk leaves, knotted them with fishing line in different lengths and then wrapped the other end around a toothpick. The toothpick was placed under the ceiling tiles at the joints. It looked like the leaves really were falling.
And the colors made the room look wonderful.
Hope you may have been inspired to try one of our decorations. It is so much fun and makes folks feel really special. We'll be doing the room decor again for Christmas and I will try to share those with you once we have things set up.
Thanks for the visit! Come on back soon!
Blessings to you,
Vicki
Thursday, October 29, 2009
From One Friend to Another
Awww! I'm so honored to have been given this award by Linda from Payne Holler Cards. Linda does such awesome work and has been such an inspiration and blessing to me!
I am supposed to tell five things about myself with this award:
1. I love winter weather so I am looking forward to the next few months!
2. I am a terrible housekeeper! Clutter is my friend! And creative clutter is a dear friend!!
3. I eat potato chips ON my bologna sandwich! Saves time!
4. I love to see people laugh and have a good time, even if they are laughing at me! (oh wait, they are laughing with me, right?)
5. I cry a lot... happy, sad, emotional, and worst of all when I am mad! Then I cry more cause I am mad that I cry when I'm mad...it's hopeless!!
Now I would like to share this award with some friends who are always encouraging and supportive and true blessings to me:
Kathy
Karli
Michelle
Maria
Monica
Thanks for visiting today and I hope the rest of your week goes well!
Blessings to you,
Vicki
Tuesday, October 27, 2009
Spice Cake Pumpkin
Hello everyone! Hope your week is going well!
I want to share with you today a pic of the cake I made for our Senior group function at church. Many there thought it was a fake and only for decoration! But it was a ready to eat cake.
I baked two bundt cakes and stacked them tops together. This was a spice cake pumpkin. I made the orange frosting and used the design on the cake to add texture to the pumpkin. The bottom border is English ivy leaves. The top is a combination of silk leaves and a real pumpkin stem. The stem makes all the difference! I have to admit that I got a pretty strange look from the produce guy when I asked for just the stem! He had a big grin and cut a stem for me. I explained I needed it for a pumpkin shape cake and he seemed relieved!
The cakes can be made well ahead and frozen if necessary. The frosting will last up to a month if kept tightly covered and refrigerated. I store all my frosting in zip lock bags and freeze any leftovers for the last minute cupcakes or cookies.
It was fun to see the reactions to this cake and one lady even winced when I went to cut it! The double cake makes for nice big slices so you may need a bigger plate than regular dessert size or flip one layer over the other when you plate it. You could also carve a face into the cake if you need a jack-o-lantern.
Thanks for stopping by today and letting me share some of the fun stuff I get to do besides paper crafting. Hope you will come back often!
Blessings to you,
Vicki
Friday, October 23, 2009
It's Friday Already?!?!?
Hello! It is going to be a reading post today as I am rushing around this week. Just wanted to let everyone know I'm still here!
It has been a very active time for our church. First we had "Old Timers Day". It's a fun time when we all dress up in ol' timey outfits and celebrate all the folks who have gone on before us. We gather for fellowship and a feast after church. We have to specify to bring a covered dish with food in it or we have a couple of empty bowls sitting on the table! We have had some really good recipes come out of these dinners!
On Wednesday, I cooked our bimonthly fellowship dinner. The meatloaf, mashed potatoes and green beans went over really well on a chilly night. Of course, the German Chocolate cake wasn't turned down either!
This Saturday we have our KeenAgers Fall gathering. These are our Seniors and they are an awesome group of folks! It's that covered dish thing again and we eat like kings! (Hey, we're Southern folk and our favorite thing to do is Meet, Greet, and Eat!) We also try to have some table favors for everyone. So, I have been busy making candy corn treats, Fall Fun Mix bags, and pillow box door hangers filled with goodies. I love every minute of it!
I am also getting ready for a craft fair in November. I hope to have some pics to post soon of some of the items I hope to sell. For now, the challenges and card making will have to wait a bit!
I appreciate you stopping by and listening to my ramblings! I am busy but still blessed and I am so thankful for the friends and family that share this time with me! Come back when you can, check the labels list if you like and take away what you can use! It's no fun to be a crafter if you can't share your ideas with friends!
Be sure to take time for yourselves and get out and enjoy some Fall color! We only have it for a short time so we need to grab the fun while we can! Hope each of you is well and Happy Fall Y'all!
Blessings to you,
Vicki
Tuesday, October 20, 2009
Blog Candy Winner!
After much shaking and stirring, we have a winner for the Thank You blog candy! Congratulations, Lynn! Your name was drawn and you will be receiving a "goodie box" soon! I just need you to email me with a mailing address. Thank you to all who commented and made my little milestone so much sweeter! Blessings to you all!
Vicki
Vicki
Monday, October 19, 2009
A Glittery Happy Thanksgiving
Welcome! Have you gotten into the feeling of Fall yet? I certainly have! The cooler temperatures, the leaves changing color and pumpkins everywhere...
How could you help but know Autumn's blessings for us all? It was this feeling of changing seasons and the Fall beauty all around that inspired the card I have to share with you today!
I started with a Kraft card base and then stamped a background of acorns, leaves, corn and trees. I ran the card through the Cuttlebug with the Forest Branches folder. I also used Kraft stock for the sentiment image. I stamped it with SU craft ink and clear embossed it. Then it was cut out with Nesties. I stamped an acorn "frame" around the image. Next I colored with Prismas. Then the real fun began! I added a wide green satin ribbon across the bottom and proceeded to play with the glitter! I stopped myself just in time as I outlined the inner and outer frames. The final touches are glitter leaf brads and a gold/black button. Whatta you think? Too much?
Is there ever too much?!?
Thanks so much for dropping by today! Hope you had a little fun looking around and maybe even got a little inspiration! It is always such a joy to have you visit! Get out and enjoy the beauty when you can! Winter could be here before we even get the leaves raked!
Blessings to you,
Vicki
Friday, October 16, 2009
Designing DIVAS Challenge
Good Morning !
I have a project to share with you today that was made for a challenge with the Designing DIVAS at SCS. We were asked to make a Christmas tree box ornament. This was a real treat for me! I love making 3D projects!
I used patterned card stock for the tree. The swirls that formed the pattern just called out for embossing powder so I used my embossing pen to trace the swirls. I then heat set the gold powder. The picture doesn't show the shimmer nearly enough but it's there. For the flower I used a daisy punch and punched two red and one gold flower. I edged the red petals with gold marker. Next, I layered the pieces and secured them with a gold brad. The hanging loop was made with gold cording.
I hope to make several of these to fill and hang on the tree this year. Always nice to have a little something to give people who visit and they can choose one right from the tree. We have always used candy canes for this before but I think the tree boxes will be a nice touch this year.
Thanks for stopping by today! Come back when you can and stay a while. I'll put the coffee on!
Oh, and don't forget to stop by the Thank You post and leave a comment so you can be in the prize drawing!
Blessings to you,
Vicki
Wednesday, October 14, 2009
Sweet Dreamers Challenge Cute As A Bug
Hello and welcome!
It's time for another Sweet Dreamers Challenge and this week we were to include a bug or bugs in our project! I had these die cut dragonflies and thought they would work perfectly. The real challenge was to find a background for them! I decided to go with a Stampendous set- The Flower Garden, I love the different elements of this set and was able to use several on this card. The bird bath is my favorite. I stamped the cental image and then filled in with the grass and flowers. Next I used pearl chalks to color the background. The sentiment stamp is also from this set. I cut it out with a scalloped oval punch and then layered it onto a blush pink paper. The edges are sponged with Brilliance silver and jade inks. Had to have a little bling so I added the crochet flower with a rhinestone brad. The dragonflies took flight on glue dots. I love the colors in this card; and, although it may look a little more Spring than Fall, I enjoyed a break from the oranges and browns.
Hope you are having a wonderful week so far! It's been a busy one for me. Be sure to check out the previous post to this one so you can enter for the blog candy! And take a look at the other Dreamers challenge projects while you are here! They are listed on the sidebar! Sweet Dreams to all!
Blessings to you,
Vicki
Tuesday, October 13, 2009
Thank You!!
Hello and Welcome to the celebration! It is a time to party as Bountiful Blessings just went over 10,000 hits!! Thank you so very much to those who have visited and hugs to all who come back often!
Now, we can't have a celebration without a few party favors, RIGHT? So, I am happy to offer a little treasure of goodies to a lucky winner! All you have to do to be eligible is leave a comment here on this post by Sunday, October 18th at midnight! The more comments you leave, the more chances to win!
The last time I offered blog candy, my dog Molly picked the winner. I had promised the cats they could pick next time, but I'm afraid that's just too many paws to pick a clear winner. (I have five cats!) So, we will use the time tested, old fashioned method and draw a name out of a punch bowl! Sorry, Kitties!
I can never express my appreciation to all of you for the time you take to visit and especially to those who leave such encouraging and inspiring comments! You are a blessing to me!
So spread the word! There's a party at Bountiful Blessings and all are invited!! Come as you are and leave a little love! The lucky winner will be announced on Tuesday, October 20th!
Blessings to you,
Vicki
Monday, October 12, 2009
You Bless Me
Hi and welcome! So glad you could stop by!
I have a card today that pretty much says how I feel about all of you who visit this blog! You do truly bless me!
I started this card with a green card base that I embossed with the Textile folder in the Cuttlebug. I used an image from Rubber Stampede and colored it with Prismas. I then cut it out with my Nesties scalloped oval. It is adhered to the base with dimensionals. The sentiment stamp is from Stampabilities and the image is cut with decorative scissors. I outlined the image and the sentiment with Deco Writer's paint. I love the added shimmer from the paint. I also deckled the edges of the card.
Thanks so much for your visit! Hope you will look around before you go and that, just maybe, you will be a little inspired by something you see. You can always email me or leave a comment if you have any questions or suggestions.
Blessings to you,
Vicki
Saturday, October 10, 2009
Sweet Dreamers' Challenge Christmas Cards with Animals
Hello Everyone! Hope your weekend is turning out to be just what you wanted!
The project I have to share today is for the Sweet Dreamers' Challenge this week which is to make a Christmas card with animals on it! I chose one of my favorite images-the Lion and the Lamb. It is such a beautiful image and says so much! I started with a blue/green card stock base. Then I embossed it with my Snow Dots folder. I wanted a distressed look to the base but my card stock was not white core and the sanding didn't show up very well. So, I versamarked the entire surface and heat embossed with white powder. Now the sanding really made the dry embossing stand out and I got a muted color that I really like. I distressed the edges of the base with a hobby blade. The image is mounted onto cardboard. I deckled the edges and then distressed them with a hobby blade, too. I also sponged the edges with Weathered Wood distress ink. I added silver brads to the corners and then adhered the image with dimensionals. I added the Peace brad as the sentiment. After rounding the corners of the card, I decided I was happy with the look.
This card got me in the mood to make more Christmas cards so hopefully I will be ahead of the season this year...nah, who am I kidding?!?! Sometimes the pressure of the moment makes the creative juices flow more freely so I'll wait for that! Sounds good anyway, don't ya think?
Thanks for stopping by and be sure to check out the other Sweet Dreamers' projects this week. They are listed on the sidebar. Lots of talent and inspiration from these ladies!
Blessings to you,
Vicki
Thursday, October 8, 2009
Fall Friends Quilt
Hello! What a beautiful busy week this has been! I had a wonderful fun time Monday at G.A.S.! Yep, you read that right! GAS is a local Gathering and Stamping group. We had a blast working on post it note holders and Christmas cards! On Tuesday I got to spend the day with a dear friend. We had breakfast and then shopped til we dropped! What a treat! Wednesday was my day to cook fellowship dinner for our church. I do the dinners twice each month and we have such a good time. Simple fare but fun for me as I love to cook! So, you can see, I finally had time to sit down with you and my blog!
Today's project is the exact opposite of my last post. The Faith card was simple in design but bold in content. This card is just BOLD! I started with a white card stock base. I punched twelve coordinating squares from Fall patterned paper. I attached these in quilt fashion and added the faux stitching. I then went over the entire surface with Antique Linen distress ink. I stamped the sentiment on white card stock and cut it out with Nesties. I also went over that surface with the distress ink. Then I crumpled the stock and smoothed it out again for a more worn look. I didn't want to crumple it before I used the distress ink because I didn't want ink lines running across my sentiment.I added doodles to each scallop and then adhered the piece to the card with dimensionals. To further the vintage feel I added a crochet flower with a button center (the flower crocheted by my Mom of course for those of you who remember her Lord's Supper piece). Then to really add some flair, I added the brown organdy bow and repeated the button center. Whew! So much compared to my usual projects! But what fun! I love to just pull out all the stops sometimes and see what happens, don't you? I guess that's why sketches are so hard for me. I never know the outcome til I'm done and that's the most fun!
I hope you have enjoyed your visit today! Please stay and look around as long as you like or have time for! Since I no longer drive, this blog has become my way to stay in touch with family and friends. It is also my way to "meet" new friends and stay in touch with the world "out there". So, do come by when you can, say hello or not, but always know you are welcome!!
Blessings to you,
Vicki
Tuesday, October 6, 2009
Faith
Hello to all! Hope your week is going well!
Today's card is a fairly simple one but with a bold statement. Faith is something we all have in one form or another. So many of us seem to be facing tests and trials these days. I thought this stamp of the church made a bold statement on its own but, combined with the one word "Faith", I thought it really spoke to me. Faith is the one thing that can help us all manage whatever life throws at us. It is a source of strength that can make any trial bearable. One small word but with big meaning!
I started this card with an ivory card base. I then layered patterned paper over that. It's very subtle but I then stamped onto the background with scripture verses. The church was stamped next. I stamped the church again on ivory card stock, embossed it, and cut it out. I then placed the cut out image over the stamped image with dimensionals. The word Faith was also stamped on ivory card stock and embossed. It, too, is adhered with dimentionals. I thought about adding other embellishments but everything seemed to take away from the focal image or lessen the impact.
I thank each of you for stopping by today and I hope in some way you may have been inspired. I love a project with all the bells and whistles and bows and bling. I just felt today's image had the strength to stand on its own. Keep the Faith!
Blessings to you,
Vicki
Friday, October 2, 2009
Fun Puddles
Hello Everyone! Hope you have had a good week! It has been beautiful here with cool temperatures at night and warm sunny days. Such a welcome relief after two weeks of rain.
When I found this image on Digital Two for Tuesday , I had to smile as I remembered when my girls loved to play in the puddles. They would jump and splash but then they would try to float leaves on the water like they were sailing big ships.
I started today's card with a black card stock base. I then layered the Fall Stack DP onto that. This little girl image is colored with Prismas. I used my Nesties to cut out the image and shadowed the edges with Weathered Wood distress ink.I added the brads to the corners and I then adhered it with dimensionals. The pink bow was added to bring out the color in her bonnet. I also scalloped the opening edge of the card just to add some interest.
We always had such fun in those puddles! Thanks for joining me down memory lane and sharing the joy with me as this little one also discovers fun puddles! We can all use a little fun like this don't you think? I hope you all have a blessed weekend and you will stop by again soon! I so enjoy hearing from you and sharing my crafting fun!!
Blessings to you,
Vicki
Subscribe to:
Posts (Atom)